
How to Set Up a Google Business Profile for a Roofing Company

- What you need before you start
- Step 1: Find or create your business
- Step 2: Enter your business name and choose “Roofing contractor”
- Step 3: Decide whether to show your address
- Step 4: Add the towns you serve
- Step 5: Add your phone number and website
- Step 6: Enter your mailing address (service-area businesses only)
- Step 7: Add your services
- Step 8: Set your business hours
- Step 9: Write your business description
- Step 10: Add photos
- Step 11: Verify your profile
- Your first 30 days after verification
- Mistakes that hold roofing profiles back
- Frequently asked questions
- Want help getting your profile working?
The short version
Go to business.google.com, enter your exact business name and choose Roofing contractor. Show your address if you have an office customers can visit, since a visible address is a real ranking advantage; otherwise hide it and list your service area. Then add your towns, phone and website, and verify.
Screenshots taken October 2026. Google changes this screen often.
Your Google Business Profile is the listing that shows up on Google Maps and in the map results when a homeowner searches “roofer near me.” For most roofing companies it brings in more calls than the website does, and setting it up is free. To set one up, go to business.google.com, enter your business name, choose Roofing contractor as your category, enter your office address if customers can visit it (or hide it if they can’t), add the towns you serve, then verify that you’re a real business. The setup takes about 20 minutes. Verification can take a few days.
To take these screenshots, we set up a profile for our own company, Limitless Local, so every screen below is the real one. We’re a marketing agency, not a roofer, so wherever our answers differ from yours we’ve noted what a roofing company should choose. This walkthrough is part of our local SEO services, where we do this for roofers every week.
What you need before you start
- A Google account the business owns. Use a company email address, not your personal one and not your marketer’s. Whoever creates the profile owns it, and getting ownership back later is a slow process.
- Your exact business name, as it appears on your trucks, yard signs and license.
- A local phone number that a person answers during business hours.
- Your website address.
- Your business address. If customers can visit your office or shop, it appears on your profile. If they can’t, Google uses it only to verify you and keeps it hidden. PO boxes and virtual offices aren’t allowed either way.
- The list of towns you serve and the list of services you offer.
- Photos of your real work: your crew on a roof, your truck, finished jobs. You can add these later, but they matter.
Step 1: Find or create your business
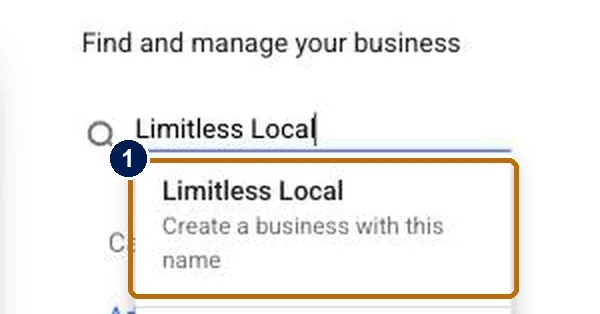
Go to business.google.com, sign in with the company Google account, and type your business name in the search box. If your company already appears in the list, Google created a listing from public information, and you should claim that one rather than starting a second. Two profiles for the same company split your reviews and can get both suspended. If you aren’t in the list, choose Create a business with this name (1).
Step 2: Enter your business name and choose “Roofing contractor”
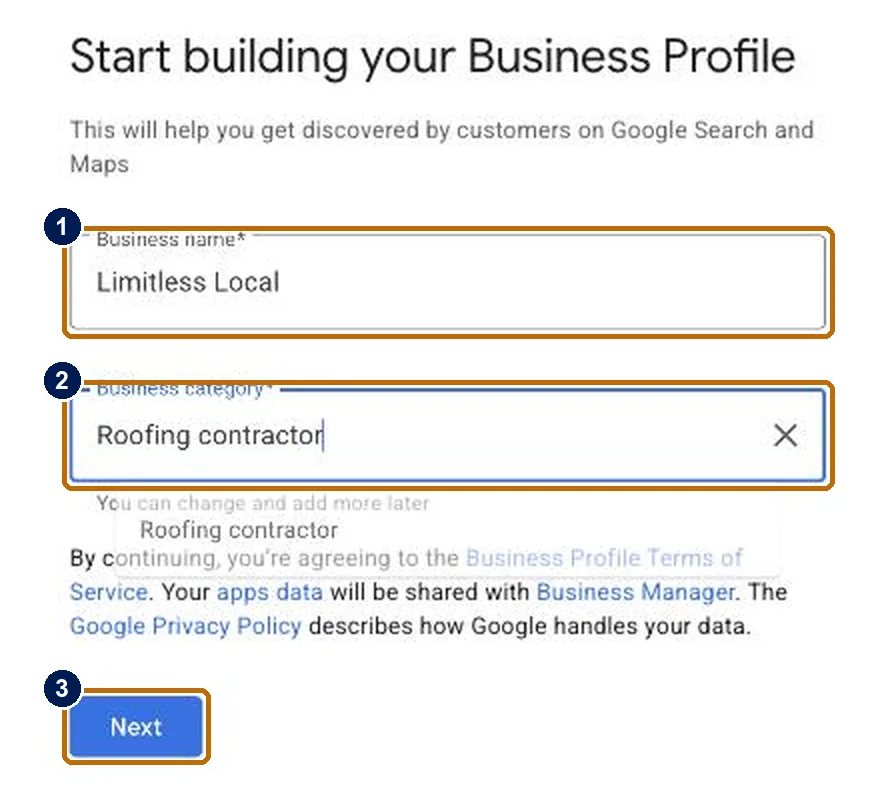
Enter your business name (1) exactly as it appears in the real world. Don’t add “Roofing,” your city, or “Best” unless those words are part of your registered name. Adding keywords to the name breaks Google’s rules, competitors report it, and a suspended profile costs far more than any short-term boost.
For the business category (2), start typing “Roofing” and choose Roofing contractor. Your primary category has a large effect on which searches you show up for, so choose the one that describes most of your work. You can add secondary categories later for other real services, such as gutters or siding. Then click Next (3).
Step 3: Decide whether to show your address
Google asks whether customers can visit you at a store or office. This is the most important decision in the setup, because it decides whether your profile shows a street address or only the towns you serve.
If you have a real office, shop or showroom, show the address. A visible address gives your profile a real advantage in the map results. In the markets we work in, it’s rare to see a roofer with a hidden address in the top three when the competitors around it show theirs. Google is strict about what counts, though. Under Google’s guidelines, the address has to be a place with your sign on it that’s staffed during the hours you list. Virtual offices, mailbox services and shared workspaces without your own signage aren’t eligible, and listing one is a common reason profiles get suspended.
If customers can visit your office or shop
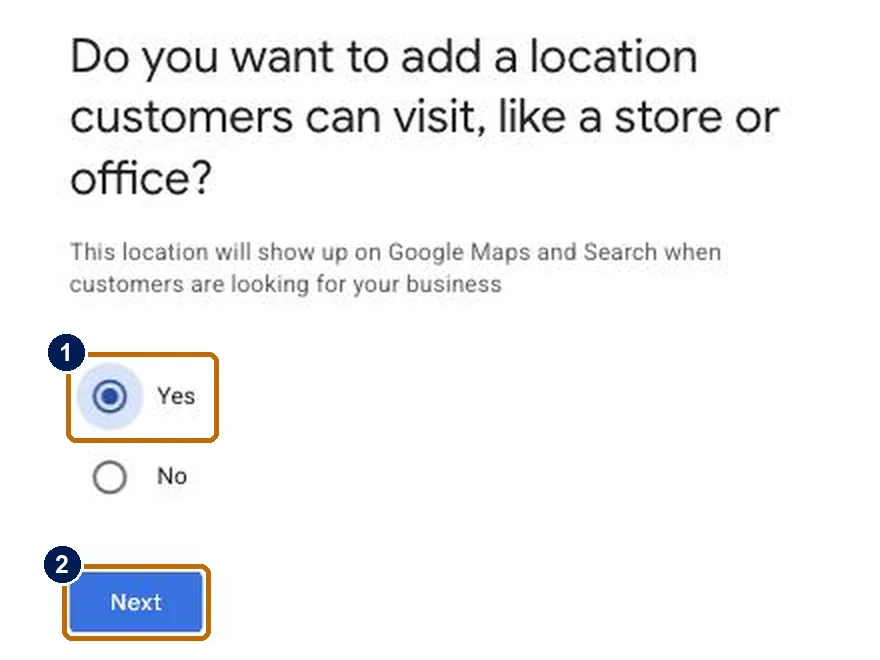
Choose Yes (1) and click Next (2).
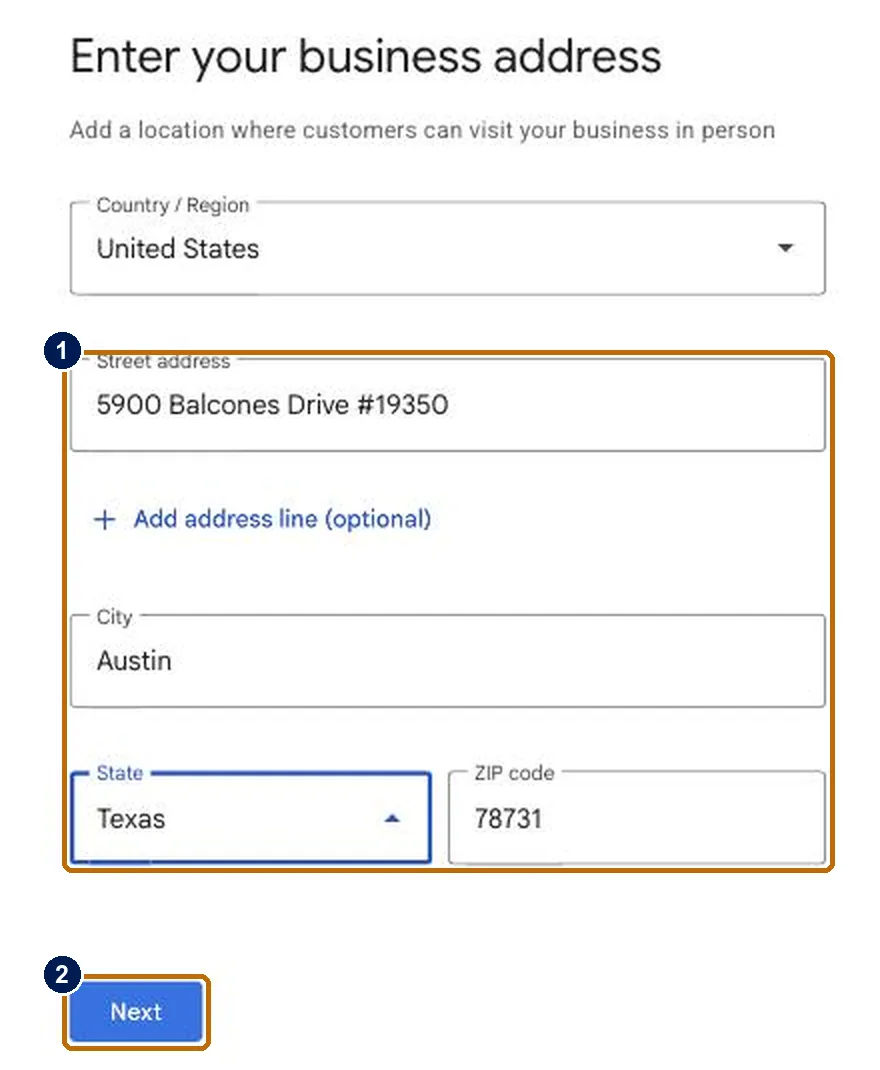
Enter the address exactly as it appears on your signage and mail, including any suite number (1), then click Next (2). We used our Austin office address for these screenshots. Use the same format here that you use on your website and in directories, so every listing matches.
Google then checks whether your business is already on Maps and shows any listings at or near that address. If one of them is yours, select it and claim it rather than creating a duplicate. Otherwise, choose None of these and continue.
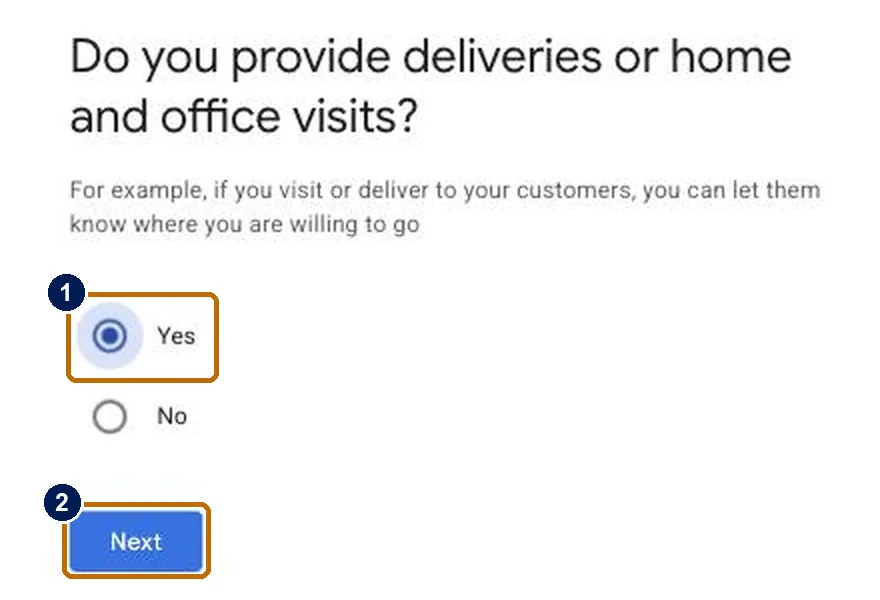
Next, Google asks whether you also visit customers. As a roofer, you do, so choose Yes (1) and click Next (2). Your profile will then show both your address and the towns you serve, which is the strongest setup for a roofing company with a real office. Because your address is public, Google verifies the business at that address, and you won’t see the mailing-address screen in step 6.
If you work from home or customers don’t visit you
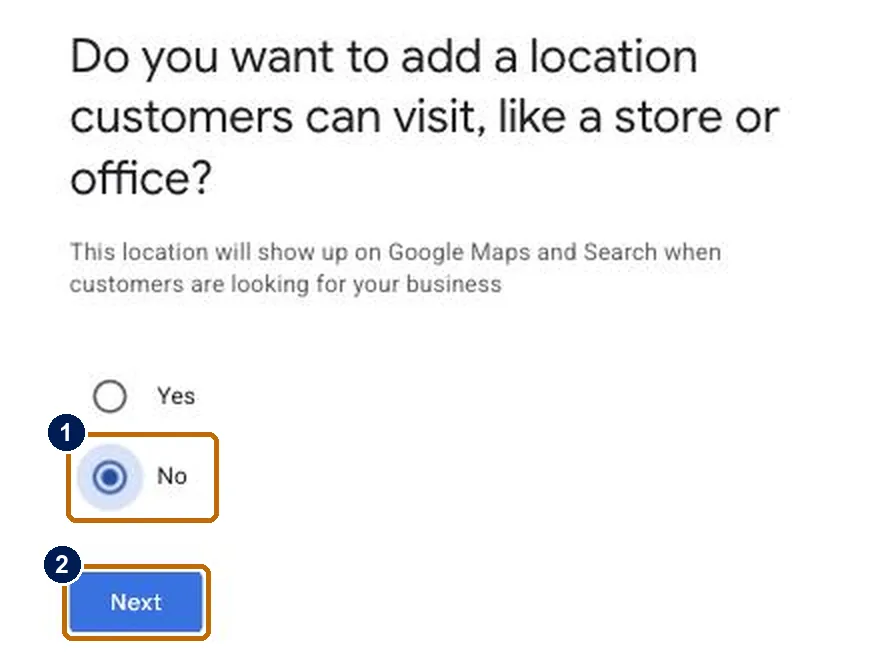
Many roofing companies run from a home office or an equipment yard that customers never visit. That makes you what Google calls a service-area business. Choose No (1) and click Next (2), and Google will hide your address and show the towns you serve instead. Don’t list a home address as a storefront to get the ranking advantage. It breaks Google’s rules, and it’s one of the most common reasons roofing profiles get suspended.
Step 4: Add the towns you serve
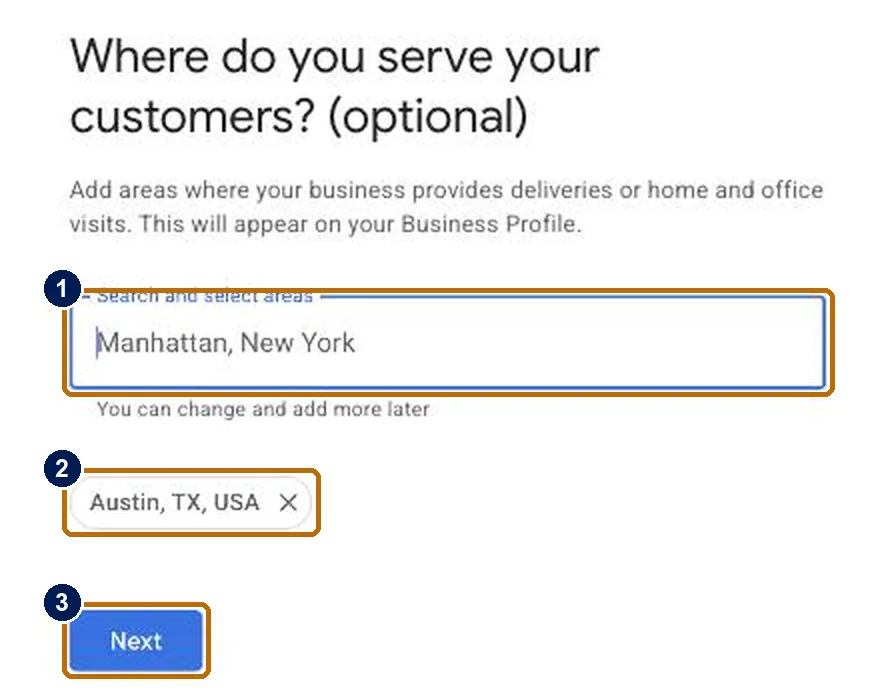
Both paths lead to this screen. Search for each city or ZIP code you work in (1) and select it from the list so it appears below the box (2). Click Next (3) when you’re done. Google asks that your overall service area stay within about two hours’ drive of where your business is based.
Adding a town here doesn’t mean you’ll rank there. Distance still matters for the map results, so you’ll usually show up most strongly near your base. Reaching further out takes reviews from customers in those towns and pages on your website about them, which we cover in our roofing SEO guide.
Curious what your marketing is actually booking?
Get a free visibility audit — no obligation, no sales pitch.
Step 5: Add your phone number and website
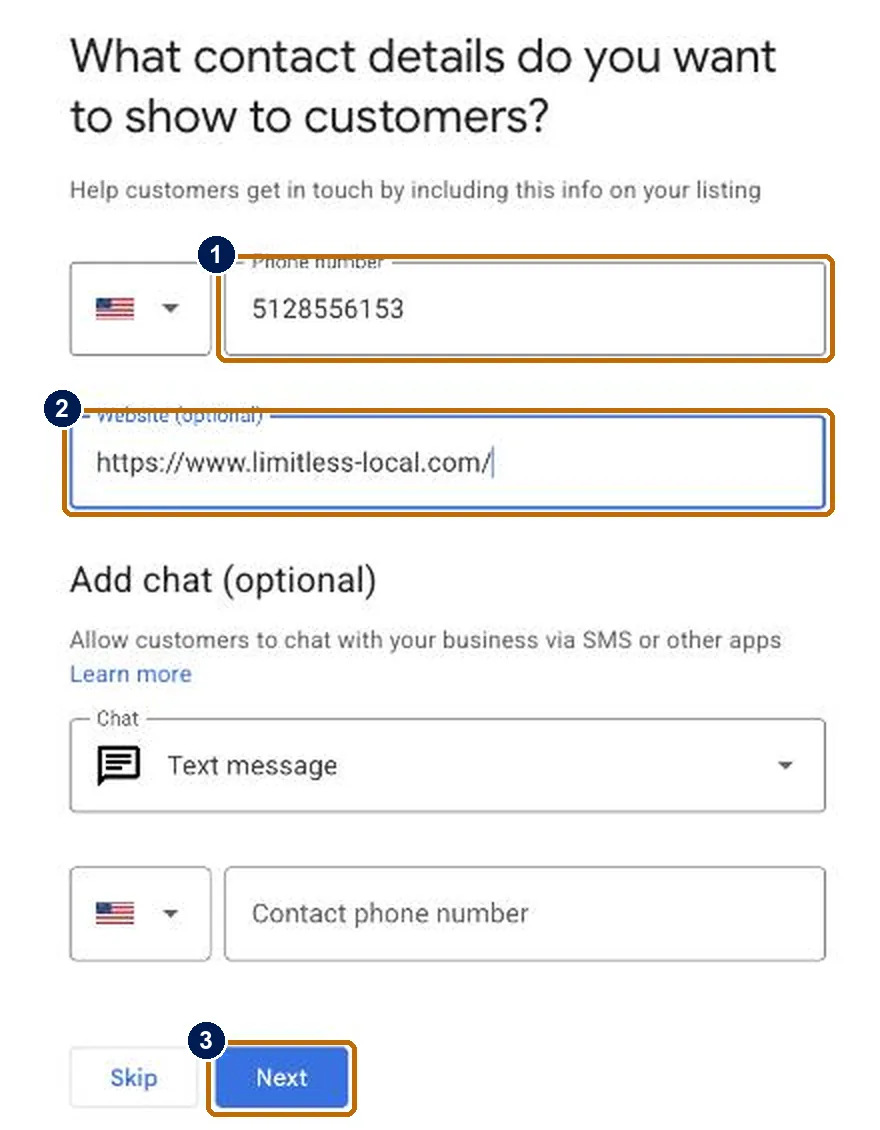
Enter the phone number you want homeowners to call (1) and your website address (2), then click Next (3). Use a number that’s answered by a person. A homeowner with a leak usually calls the next roofer on the list rather than leave a voicemail.
If you use call tracking, put the tracking number in the main field and add your regular line as an additional number afterward, so your listings elsewhere still match. Google also offers a text message option here. Turn it on only if someone will answer texts quickly.
The next screen asks whether you want tips and updates from Google by email. Either answer is fine, and it has no effect on your listing.
Step 6: Enter your mailing address (service-area businesses only)
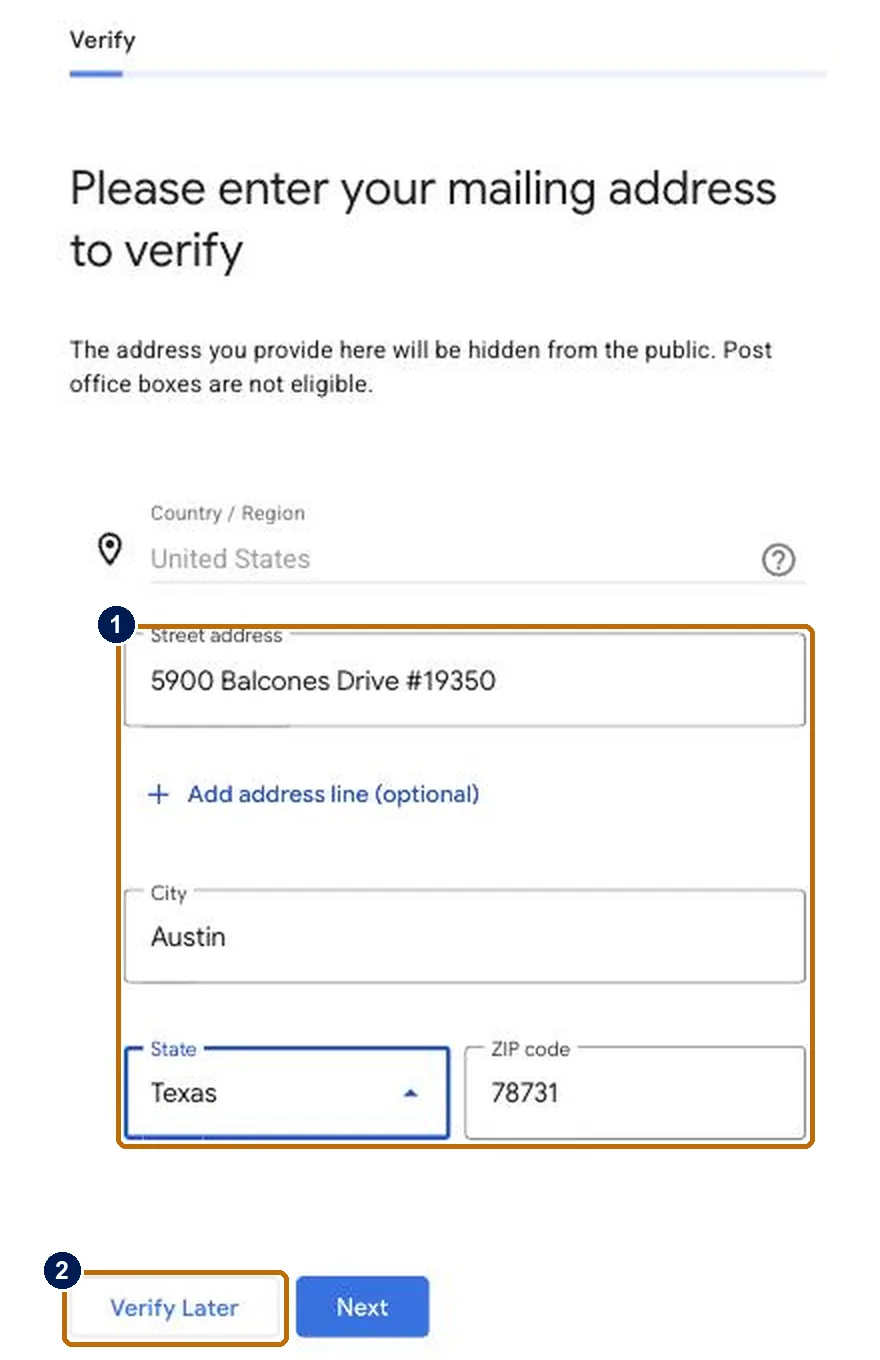
Google asks for a mailing address to verify you (1). Because you chose No in step 3, this address stays hidden from the public. Enter the address your business actually runs from, which for many roofers is home. Then click Next to verify now, or Verify later (2) to finish the profile first. We chose Verify later, so the rest of the setup is shown before verification.
Step 7: Add your services
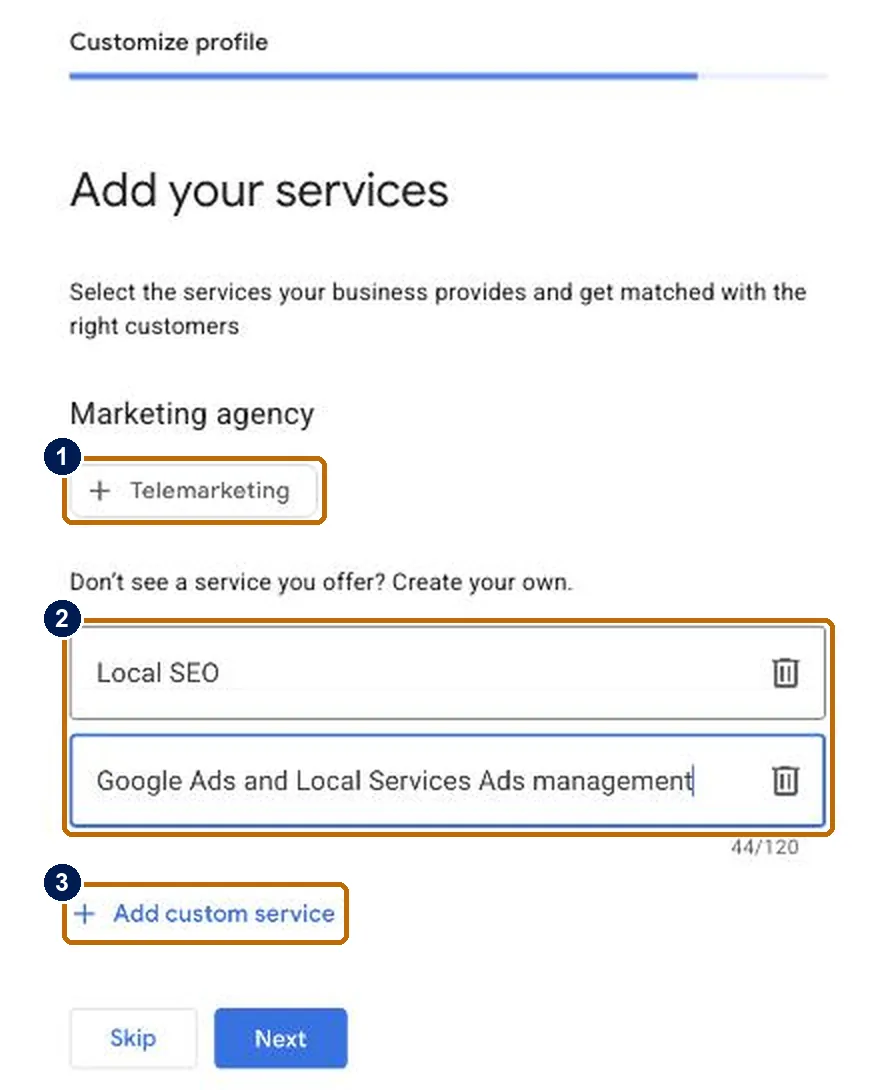
Google suggests services based on your category (1). A roofing contractor sees roofing services here, while ours shows marketing ones. Select every suggestion that matches work you actually do. Then add your own (2): roof replacement, roof repair, storm and hail damage repair, insurance claim help, gutter installation, and anything else you want to be found for. Use Add custom service (3) for each new one.
Use the same service names on your website. When your profile and your service pages describe the same work in the same words, Google has an easier time matching you to the searches for it.
Step 8: Set your business hours
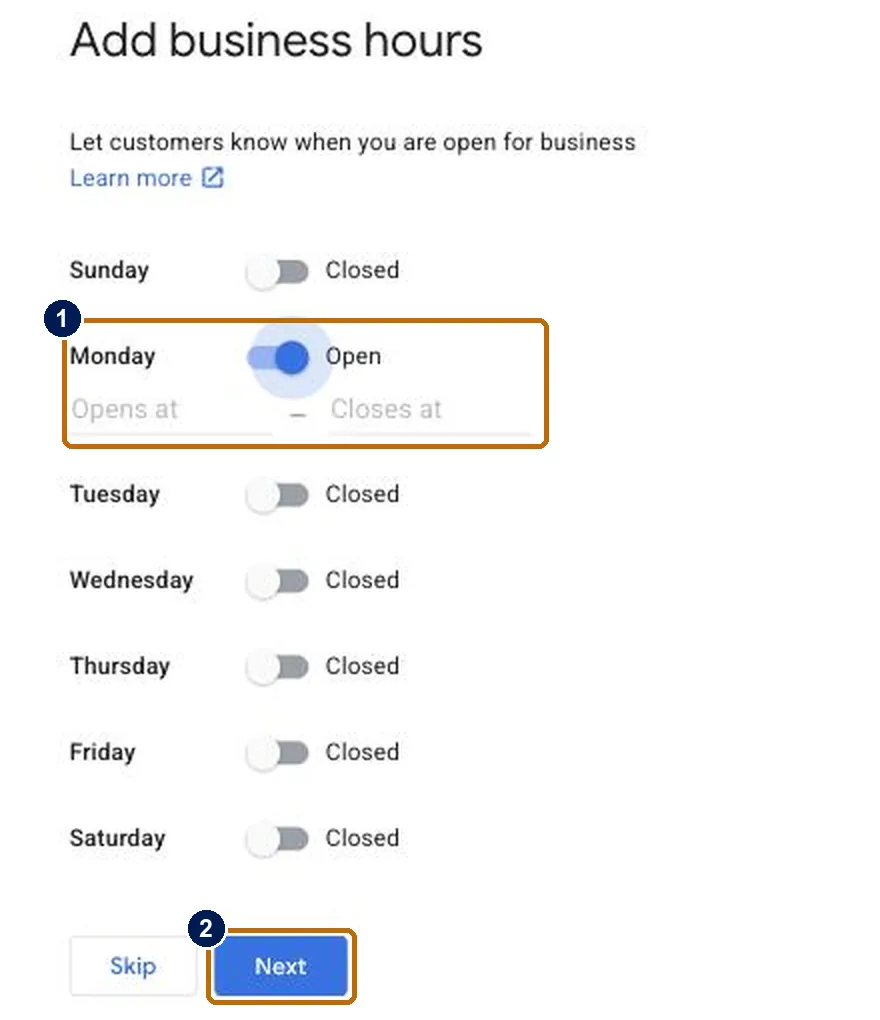
Turn on each day you’re open and set your opening and closing times (1), then click Next (2). List the hours your phone is answered, not the hours your crews are on roofs. If you take emergency calls around the clock, list 24 hours only if a person really picks up at 2 a.m.
Step 9: Write your business description
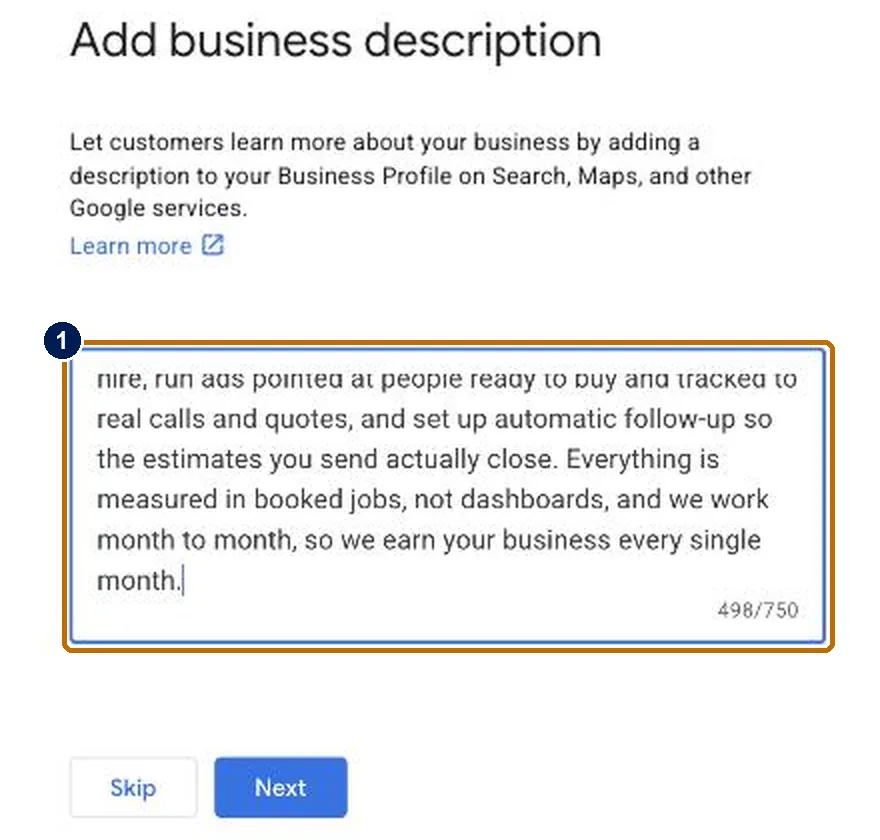
You have 750 characters (1) to tell homeowners who you are. Say what you do, where you do it, and why someone should call you rather than the next roofer. Leave out links, phone numbers, sales and capital letters, which Google doesn’t allow here. A simple structure works:
[Company] is a family-owned roofing contractor serving [city] and the surrounding towns since [year]. We handle roof replacement, roof repair, and storm and hail damage, and we work with your insurance company on claims. Every estimate is free and in writing, and we clean up the job site before we leave.
Step 10: Add photos
Drag your photos into the box or click Select images (1). Add your logo, a cover photo, and pictures of real jobs: your crew at work, your truck with your name on it, and before-and-after shots of finished roofs. Homeowners look at the photos to decide whether you’re an established company, so skip stock photos entirely. If you don’t have good photos yet, skip this step and add them over the next few weeks.
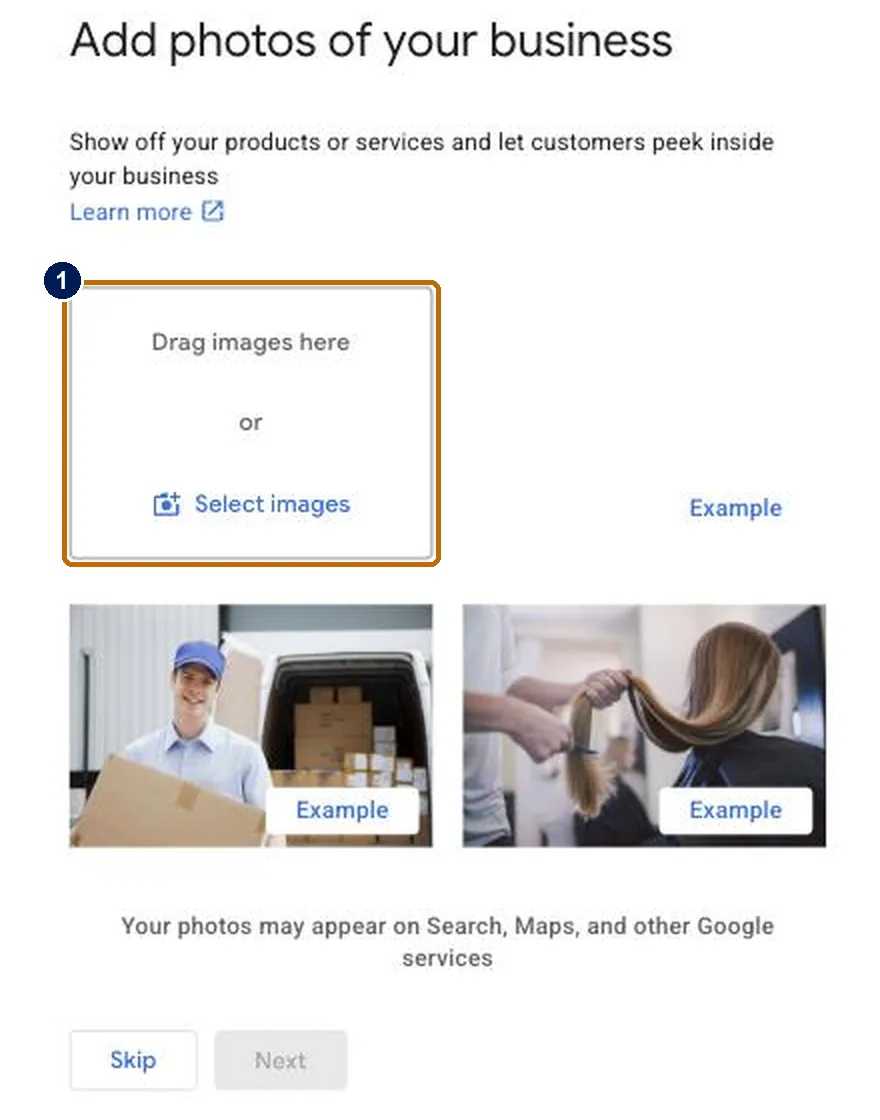
Google will then offer to set up an ad for you. Skip it for now. Ads such as Google Local Services Ads can work very well for roofers, but they’re worth setting up deliberately, with a budget and call tracking, rather than as an extra step during setup.
Step 11: Verify your profile
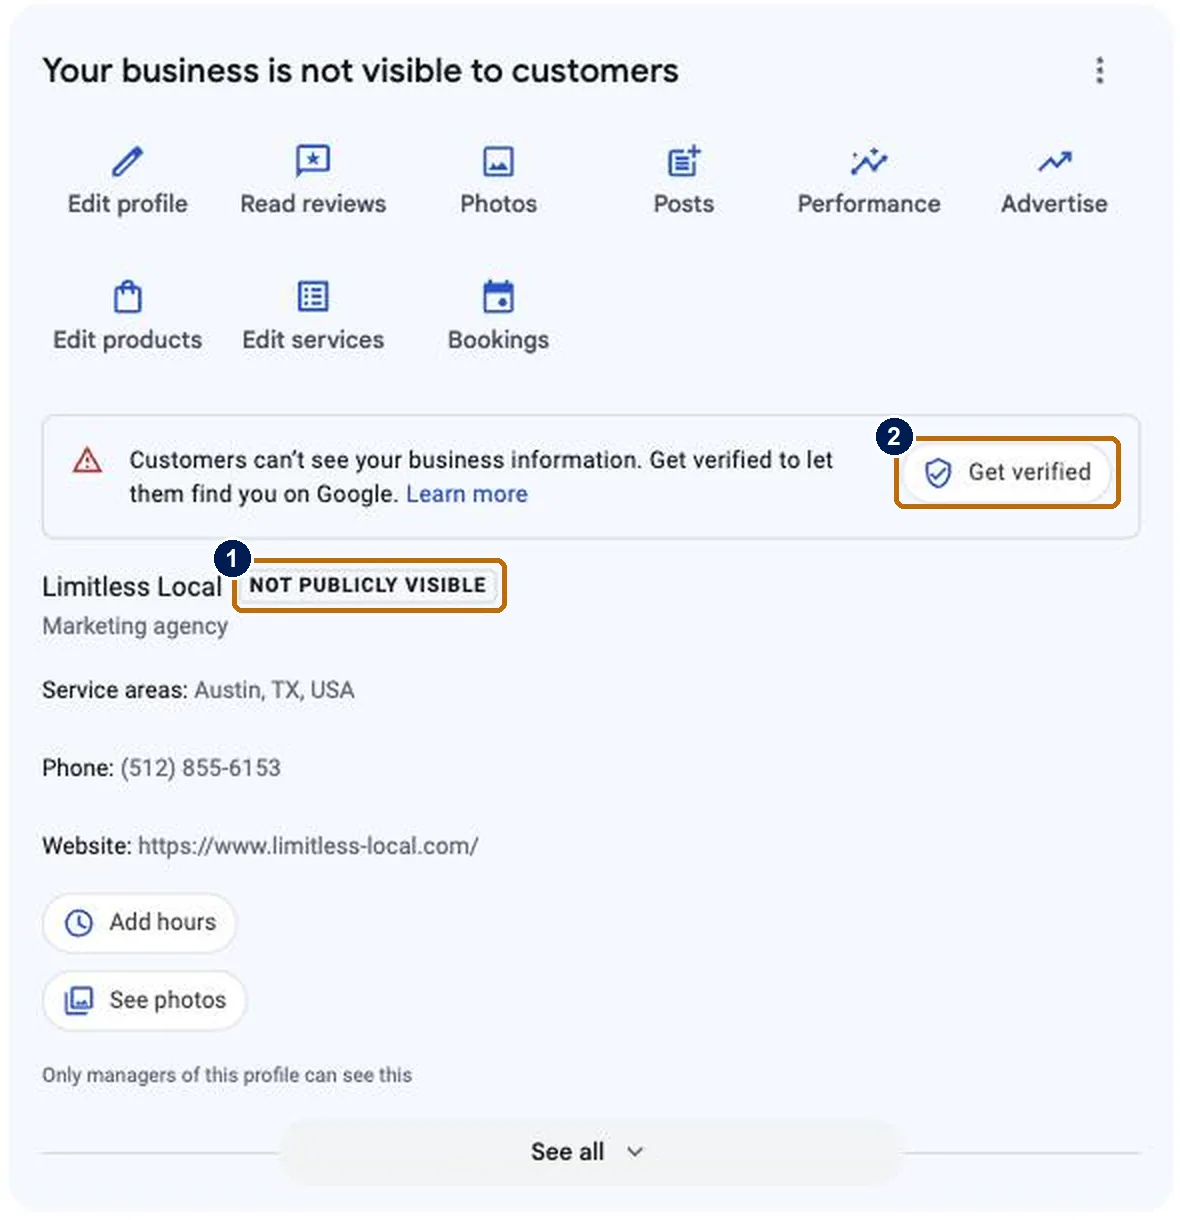
Until you verify, your profile is marked Not publicly visible (1), and homeowners can’t see it. Click Get verified (2) to start. Google chooses the verification method based on your business, and it can’t be changed. The options include:
- A video recording or live video call, which Google recommends when it’s offered. Be ready to show where you’re based, your branded truck, equipment or tools, and something that proves you run the business, such as your keys or a business document.
- A phone call or text with a code. An automated phone menu won’t receive it, so make sure the number reaches a person.
- Email or a postcard for some businesses.
Google then reviews the submission, which usually takes a few days. Avoid changing your name, category or address while it’s under review.
Your first 30 days after verification
A verified profile with no reviews and no photos rarely beats the established roofers in your area. These are the things that move it:
- Ask your last 10 to 20 happy customers for a review. Reviews, and how recent they are, are a large part of how Google judges which roofers to show.
- Add photos every week from real jobs.
- Make your name, phone number and service area match everywhere: your website, Facebook, Yelp, the BBB and the other directories you’re listed in.
- Link your website to your profile, and make sure the site has a page for each main service.
- Check the Performance tab once a month for calls, website clicks and direction requests, and compare it with the jobs you actually booked.
The profile is the first piece of a larger plan. Our roofing marketing guide covers how it fits with your website, ads and follow-up, and our guide to getting roofing leads covers where else the calls come from.
Mistakes that hold roofing profiles back
- Keywords in the business name. “Smith Roofing” is fine if that’s your name. “Smith Roofing – Best Roofer Dallas” gets reported and suspended.
- A profile for every town. Google allows one profile per real, staffed location. Separate profiles for towns where you have no office will get removed.
- A home address shown as a storefront. If customers don’t visit you, hide the address and list a service area.
- A real office that’s hidden. If you have an office or shop with your sign on it that customers can visit, hiding it gives up one of the biggest advantages you can have in the map results.
- A vague category. If most of your work is roofing, “General contractor” puts you in front of the wrong searches.
- Letting your marketer own the profile. Keep ownership on a company account and add your agency as a manager. That way you keep the profile, its reviews and its history if you ever change agencies.
Frequently asked questions
Is a Google Business Profile free?
Yes. Creating, verifying and managing a Google Business Profile costs nothing. Google will offer you ads during setup, but those are separate and optional.
How long does it take to set up a Google Business Profile?
Filling in the profile takes about 20 minutes if you have your details ready. Verification takes longer. Google usually reviews it within a few days, though it can take more if they need more information.
Can a roofing company have a Google Business Profile without an office?
Yes. Set it up as a service-area business: answer No when Google asks about a location customers can visit, and list the towns you serve. Your address is used only for verification and stays hidden from the public.
Does showing my address help my profile rank?
In our experience, yes, by a meaningful margin. In the markets we work in, it’s rare to see a roofer with a hidden address in the map top three when the competitors around it show theirs. Only show an address you can legitimately list: an office or shop with your sign on it that’s staffed during your business hours.
What category should a roofing company choose?
Choose Roofing contractor as your primary category. Add secondary categories only for other services you really offer, such as gutters or siding. Google advises using the fewest categories that describe your core business.
Should my marketing company own my Google Business Profile?
No. You should be the primary owner, using a company account, and your marketing company should be added as a manager. That keeps the profile, its reviews and its history with your business whatever happens.
Want help getting your profile working?
Setting up the profile is the easy part. Getting it into the map results in the towns you care about takes reviews, photos, consistent listings and a website that backs it up, which is the work our local SEO program does for roofing companies. If you want to see how your profile compares with the roofers already showing up in your area, start with a free visibility audit, or book a growth call and we’ll walk through it together.
Last updated: October 2026.
About the author
Bradley Lewis is a co-founder of Limitless Local, with 20+ years in digital marketing. He and his partner, Matt Ford, have run local service businesses across their own brands and built the Limitless playbook to get roofing and home-service owners more booked jobs, not more dashboards. Limitless has helped over 500 business owners get more work through marketing that’s measured in booked jobs.